How to Configure Aws S3 Upload in Jenkins
Setting up a CI/CD pipeline by integrating Jenkins with AWS CodeBuild and AWS CodeDeploy
In this post, I explain how to use the Jenkins open-source automation server to deploy AWS CodeBuild artifacts with AWS CodeDeploy, creating a functioning CI/CD pipeline. When properly implemented, the CI/CD pipeline is triggered by code changes pushed to your GitHub repo, automatically fed into CodeBuild, and so the output is deployed on CodeDeploy.
Solution overview
The performance pipeline creates a fully managed build service that compiles your source code. It and so produces lawmaking artifacts that can be used by CodeDeploy to deploy to your production environment automatically.

The deployment workflow starts past placing the application lawmaking on the GitHub repository. To automate this scenario, I added source code direction to the Jenkins project under the Source Code department. I chose the GitHub option, which past design clones a re-create from the GitHub repo content in the Jenkins local workspace directory.
In the second step of my automation process, I enabled a trigger for the Jenkins server using an "Poll SCM" option. This option makes Jenkins cheque the configured repository for whatsoever new commits/code changes with a specified frequency. In this testing scenario, I configured the trigger to perform every two minutes. The automated Jenkins deployment procedure works as follows:
- Jenkins checks for any new changes on GitHub every two minutes.
- Alter determination:
- If Jenkins finds no changes, Jenkins exits the process.
- If it does observe changes, Jenkins clones all the files from the GitHub repository to the Jenkins server workspace directory.
- The File Functioning plugin deletes all the files cloned from GitHub. This keeps the Jenkins workspace directory make clean.
- The AWS CodeBuild plugin zips the files and sends them to a predefined Amazon S3 bucket location then initiates the CodeBuild project, which obtains the code from the S3 saucepan. The project then creates the output antiquity nil file, and stores that file once more on the S3 saucepan.
- The HTTP Request plugin downloads the CodeBuild output artifacts from the S3 bucket.
I edited the S3 bucket policy to allow admission from the Jenkins server IP address. See the following instance policy:{ "Version": "2012-10-17", "Id": "S3PolicyId1", "Statement": [ { "Sid": "IPAllow", "Effect": "Let", "Chief": "*", "Action": "s3:*", "Resources": "arn:aws:s3:::examplebucket/*", "Condition": { "IpAddress": {"aws:SourceIp": "x.ten.x.ten/x"}, <--- IP of the Jenkins server } } ] }This policy enables the HTTP request plugin to access the S3 bucket. This plugin doesn't use the IAM instance profile or the AWS access keys (access key ID and secret access key).
- The output antiquity is a compressed Aught file. The CodeDeploy plugin past blueprint requires the files to be unzipped to zip them and ship them over to the S3 bucket for the CodeDeploy deployment. For that, I used the File Operation plugin to perform the following:
- Unzip the CodeBuild zipped artifact output in the Jenkins root workspace directory. At this point, the workspace directory should include the original zip file downloaded from the S3 bucket from Step 5 and the files extracted from this archive.
- Delete the original .zip file, and leave only the source bundle contents for the deployment.
- The CodeDeploy plugin selects and zips all workspace directory files. This plugin uses the CodeDeploy application name, deployment group name, and deployment configurations that yous configured to initiate a new CodeDeploy deployment. The CodeDeploy plugin and so uploads the newly zipped file co-ordinate to the S3 saucepan location provided to CodeDeploy as a source code for its new deployment operation.
Walkthrough
In this post, I walk you through the following steps:
- Creating resources to build the infrastructure, including the Jenkins server, CodeBuild projection, and CodeDeploy application.
- Accessing and unlocking the Jenkins server.
- Creating a project and configuring the CodeDeploy Jenkins plugin.
- Testing the whole CI/CD pipeline.
Create the resources
In this department, I prove you how to launch an AWS CloudFormation template, a tool that creates the following resources:
- Amazon S3 bucket—Stores the GitHub repository files and the CodeBuild artifact application file that CodeDeploy uses.
- IAM S3 bucket policy—Allows the Jenkins server admission to the S3 bucket.
- JenkinsRole—An IAM role and instance profile for the Amazon EC2 case for use every bit a Jenkins server. This role allows Jenkins on the EC2 example to access the S3 bucket to write files and access to create CodeDeploy deployments.
- CodeDeploy awarding and CodeDeploy deployment grouping.
- CodeDeploy service office—An IAM role to enable CodeDeploy to read the tags applied to the instances or the EC2 Auto Scaling group names associated with the instances.
- CodeDeployRole—An IAM function and instance contour for the EC2 instances of CodeDeploy. This office has permissions to write files to the S3 bucket created by this template and to create deployments in CodeDeploy.
- CodeBuildRole—An IAM role to be used past CodeBuild to access the S3 saucepan and create the build projects.
- Jenkins server—An EC2 case running Jenkins.
- CodeBuild project—This is configured with the S3 bucket and S3 artifact.
- Auto Scaling group—Contains EC2 instances running Apache and the CodeDeploy agent fronted past an Elastic Load Balancer.
- Car Scaling launch configurations—For employ by the Car Scaling grouping.
- Security groups—For the Jenkins server, the load balancer, and the CodeDeploy EC2 instances.
- To create the CloudFormation stack (for example in the AWS Frankfurt Region) click the below link:
.

. - Choose Side by side and provide the post-obit values on the Specify Details page:
- For Stack proper noun, name your stack as you prefer.
- For CodedeployInstanceCount, choose the default of t2.medium.
To check the supported instance types by AWS Region, run into Supported Regions. - For InstanceCount, continue the default of 3, to launch three EC2 instances for CodeDeploy.
- For JenkinsInstanceType, proceed the default of t2.medium.
- For KeyName, choose an existing EC2 key pair in your AWS business relationship. Use this to connect by using SSH to the Jenkins server and the CodeDeploy EC2 instances. Make sure that you have access to the private key of this central pair.
- For PublicSubnet1, cull a public subnet from which the load balancer, Jenkins server, and CodeDeploy web servers launch.
- For PublicSubnet2, choose a public subnet from which the load balancers and CodeDeploy web servers launch.
- For VpcId, choose the VPC for the public subnets you used in PublicSubnet1 and PublicSubnet2.
- For YourIPRange, enter the CIDR block of the network from which you connect to the Jenkins server using HTTP and SSH. If your local machine has a static public IP address, become to https://www.whatismyip.com/ to find your IP accost, and then enter your IP address followed by /32. If yous don't take a static IP address (or aren't sure if you accept ane), enter 0.0.0.0/0. So, any accost tin can achieve your Jenkins server.
.

- Choose Next.
- On the Review folio, select the I acknowledge that this template might cause AWS CloudFormation to create IAM resources check box.
- Choose Create and wait for the CloudFormation stack status to change to CREATE_COMPLETE. This takes approximately half dozen–10 minutes.
- Check the resulting values on the Outputs tab. Y'all need them later.
.

- Browse to the ELBDNSName value from the Outputs tab, verifying that you tin come across the Sample page. You should meet a congratulatory message.
- Your Jenkins server should be set to deploy.
Admission and unlock your Jenkins server
In this section, I discuss how to access, unlock, and customize your Jenkins server.
- Re-create the JenkinsServerDNSName value from the Outputs tab of the CloudFormation stack, and paste information technology into your browser.
- To unlock the Jenkins server, SSH to the server using the IP address and key pair, following the instructions from Unlocking Jenkins.
- Employ the root user to Cat the log file (/var/log/jenkins/jenkins.log) and re-create the automatically generated alphanumeric password (between the two sets of asterisks). And so, utilize the password to unlock your Jenkins server, as shown in the following screenshots.
.


- On the Customize Jenkins page, choose Install suggested plugins.

- Wait until Jenkins installs all the suggested plugins. When the process completes, y'all should see the bank check marks alongside all of the installed plugins.
.
 .
. - On the Create Kickoff Admin User page, enter a user name, countersign, full name, and email address of the Jenkins user.
- Choose Salvage and continue, Salvage and finish, and Get-go using Jenkins.
.
 After you install all the needed Jenkins plugins forth with their required dependencies, the Jenkins server restarts. This step should accept near two minutes. Later Jenkins restarts, refresh the page. Your Jenkins server should exist prepare to use.
Create a project and configure the CodeDeploy Jenkins plugin
Now, to create our project in Jenkins nosotros need to configure the required Jenkins plugin.
- Sign in to Jenkins with the user name and countersign that you created before and click on Manage Jenkins then Manage Plugins.

- From the Available tab search for and select the below plugins then cull Install without restart:
.
AWS CodeDeploy
AWS CodeBuild
Http Asking
File Operations
.

- Select the Restart Jenkins when installation is complete and no jobs are running.

Jenkins volition take couple of minutes to download the plugins forth with their dependencies then will restart.
- Login so choose New Detail, Freestyle projection.
- Enter a name for the projection (for instance, CodeDeployApp), and cull OK.
.

. - On the project configuration page, under Source Code Management, choose Git. For Repository URL, enter the URL of your GitHub repository.
.

. - For Build Triggers, select the Poll SCM check box. In the Schedule, for testing enter H/two * * * *. This entry tells Jenkins to poll GitHub every ii minutes for updates.
.

. - Under Build Environment, select the Delete workspace before build starts bank check box. Each Jenkins projection has a dedicated workspace directory. This option allows you lot to wipe out your workspace directory with each new Jenkins build, to continue information technology make clean.
.

. - Under Build Actions, add together a Build Step, and AWS CodeBuild. On the AWS Configurations, choose Manually specify admission and undercover keys and provide the keys.
.
 .
. - From the CloudFormation stack Outputs tab, copy the AWS CodeBuild project proper noun (myProjectName) and paste information technology in the Project Name field. Also, fix the Region that you are using and choose Utilize Jenkins source.
It is a best practice is to shop AWS credentials for CodeBuild in the native Jenkins credential store. For more than information, come across the Jenkins AWS CodeBuild Plugin wiki.
.
 .
. - To make sure that all files cloned from the GitHub repository are deleted choose Add build step and select File Performance plugin, then click Add and select File Delete. Nether File Delete functioning in the Include File Pattern, type an asterisk.
.
 .
. - Under Build, configure the following:
- Choose Add together a Build step.
- Choose HTTP Request.
- Copy the S3 bucket proper noun from the CloudFormation stack Outputs tab and paste it afterward (http://s3-eu-central-i.amazonaws.com/) along with the name of the naught file codebuild-artifact.zilch as the value for HTTP Plugin URL.
Case: (http://s3-eu-central-ane.amazonaws.com/mybucketname/codebuild-artifact.zip) - For Ignore SSL errors?, choose Yeah.
.

.
- Under HTTP Request, cull Advanced and leave the default values for Authorization, Headers, and Body. Nether Response, for Output response to file, enter the codebuild-artifact.zip file name.
.

. - Add the two build steps for the File Operations plugin, in the following order:
- Unzip action: This build stride unzips the codebuild-antiquity.zip file and places the contents in the root workspace directory.
- File Delete action: This build step deletes the codebuild-antiquity.nil file, leaving only the source bundle contents for deployment.
.
 .
.
- On the Post-build Deportment, choose Add postal service-build actions and select the Deploy an application to AWS CodeDeploy cheque box.
- Enter the following values from the Outputs tab of your CloudFormation stack and leave the other settings at their default (blank):
- For AWS CodeDeploy Application Proper noun, enter the value of CodeDeployApplicationName.
- For AWS CodeDeploy Deployment Group, enter the value of CodeDeployDeploymentGroup.
- For AWS CodeDeploy Deployment Config, enter CodeDeployDefault.OneAtATime.
- For AWS Region, cull the Region where you created the CodeDeploy environment.
- For S3 Bucket, enter the value of S3BucketName.
The CodeDeploy plugin uses the Include Files pick to filter the files based on specific file names existing in your current Jenkins deployment workspace directory. The plugin zips specified files into ane file. It and then sends them to the location specified in the S3 Saucepan parameter for CodeDeploy to download and use in the new deployment.
.
As shown beneath, in the optional Include Files field, I used (**) and then all files in the workspace directory get zipped.
.
 .
.
- Choose Deploy Revision. This option registers the newly created revision to your CodeDeploy application and gets information technology gear up for deployment.
- Select the Wait for deployment to end? cheque box. This option allows yous to view the CodeDeploy deployments logs and events on your Jenkins server console output.
.
.
Now that you lot have created a project, you are ready to test deployment.
Testing the whole CI/CD pipeline
To exam the whole solution, put an application on your GitHub repository. You can download the sample from here.
The following screenshot shows an application tree containing the application source files, including text and binary files, executables, and packages:

In this instance, the application files are the templates directory, test_app.py file, and web.py file.
The appspec.yml file is the main awarding specification file telling CodeDeploy how to deploy your application. Jenkins uses the AppSpec file to manage each deployment equally a series of lifecycle event "hooks", equally defined in the file. For information near how to create a well-formed AppSpec file, run into AWS CodeDeploy AppSpec File Reference.
The buildspec.yml file is a drove of build commands and related settings, in YAML format, that CodeBuild uses to run a build. Y'all can include a build spec as part of the source code, or yous tin define a build spec when you create a build project. For more data, see How AWS CodeBuild Works.
The scripts folder contains the scripts that you would similar to run during the CodeDeploy LifecycleHooks execution with respect to your application requirements. For more data, see Programme a Revision for AWS CodeDeploy.
To test this solution, perform the following steps:
- Unzip the awarding files and transport them to your GitHub repository, run the following git commands from the path where you lot placed your sample application:
$ git add together -A $ git commit -m 'Your offset application' $ git push - On the Jenkins server dashboard, wait for two minutes until the previously set up project trigger starts working. Afterward the trigger starts working, you should see a new build taking place.
.

. - In the Jenkins server Console Output page, bank check the build events and review the steps performed by each Jenkins plugin. You lot tin also review the CodeDeploy deployment in detail, every bit shown in the following screenshot:
.

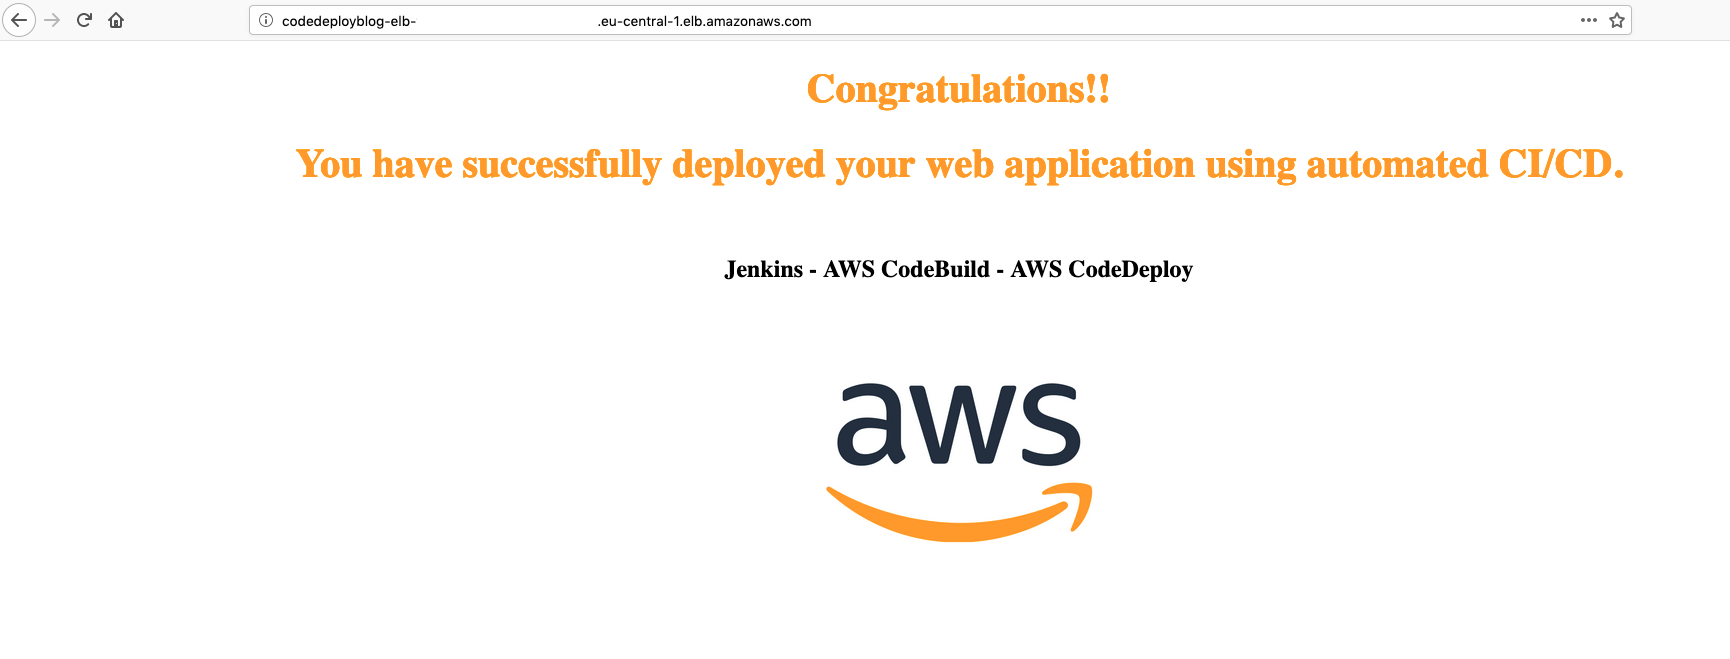
On completion, Jenkins should report that you have successfully deployed a web application. You tin can also use your ELBDNSName value to confirm that the deployed application is running successfully.
.
.Conclusion
In this mail, I outlined how you tin can utilise a Jenkins open-source automation server to deploy CodeBuild artifacts with CodeDeploy. I showed you how to construct a functioning CI/CD pipeline with these tools. I walked you through how to build the deployment infrastructure and automatically deploy application version changes from GitHub to your product environment.
Hopefully, you have establish this mail service informative and the proposed solution useful. As always, AWS welcomes all feedback or annotate.
About the Writer
.

Noha Ghazal started in Amazon Web Services as a Cloud Back up Engineer, currently she is the Operations Manager of the Analytics squad in the Premium Support. She is is a subject matter adept for AWS CodeDeploy. In her role, she enjoys supporting customers with their CodeDeploy and other DevOps configurations. Outside of work she enjoys drawing portraits, angling and playing video games.
Source: https://aws.amazon.com/blogs/devops/setting-up-a-ci-cd-pipeline-by-integrating-jenkins-with-aws-codebuild-and-aws-codedeploy/
Post a Comment for "How to Configure Aws S3 Upload in Jenkins"